
Crepe Paper Rose Tutorial
Materials You’ll Need
A strip of 12-14” long, 1-1.5” wide crepe paper (a roll of paper streamers will provide you with plenty of material!)
Floral tape (optional - regular tape works too)
Floral wire (optional)
Setting up the Pistil
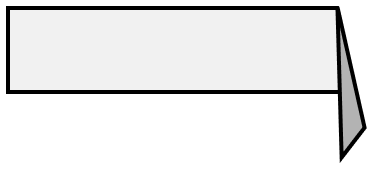
All folds should be made towards you in this part.

1. Fold the right corner down towards you at a 45˚ angle, with about 1/4 inch ‘tail’ hanging down past the streamer.
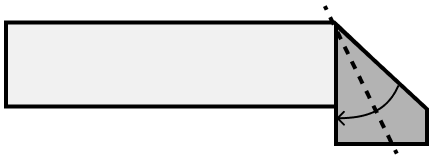
2. Fold that same corner again towards you, aligning the right edge of the fold with the left edge that you just made.
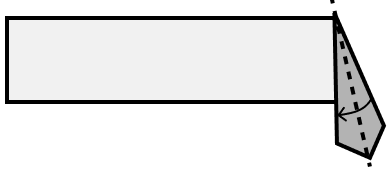
3. Do the same thing again!
4. Your paper should now look like this, and we’re ready to move onto the petal-forming part!
Background
I used to hate going to Taiwan for the summer.
It represented a large chunk of time away from my friends — most of whom stayed in Southern California and got to hang out together. The weather in tropical Taiwan muggy and humid especially during those summer months, and with barely-passing fluency in Mandarin, they were mostly weeks where I felt like luggage, being dragged from one auntie’s home to another as my mom socialized and caught up with her siblings and friends.
Of the few things I remembered looking forward to however (aside from the food — a set of memories for another time), were crafting and DIY kits. There’s a prominent craft and stationery culture in Taiwan, and I remember always being on the lookout for little kits that could sustain my attention and interest during those trips. There were little cardboard houses, origami and paper craft papers, and some of my favorites: DIY flower kits.
One in particular kept me frustrated for a bit — the rose-folding kit came with these long, thin strips of colorful foam sheets, along with floral wire and floral tape. The instructions were in Chinese, which I couldn’t (and still can’t) read, so I was left to figure out the pictures on my own, twisting the foam strips in a fashion that I thought was the correct way but ended up with malformed, springy messes that did not resemble roses in any way. It wasn’t until an older cousin showed me how to fold the strips instead of twisting it that I finally got the hang of how to make these.
Once I started, it was hard to stop for a while. I started making these from any sort of long-ish strip of material, from chopstick wrappers to craft paper I cut up. At some point, I discovered that streamer crepe ribbons were a perfect medium to work with, and thus was born my own twist on the craft, which I’m sharing here.
As a thirty-something year old, I think about Taiwan much differently. When I visit now, I think about the ways in which my affinity and connection to it goes beyond just the food and DIY culture, and now that I’m an adult, I can explore and find new experiences there of my own accord.
Did that stop me from bringing back nearly a full suitcase of stationery and DIY crafting kits last trip? Of course not.
Forming the Petals
All folds should be made away from you in this part.


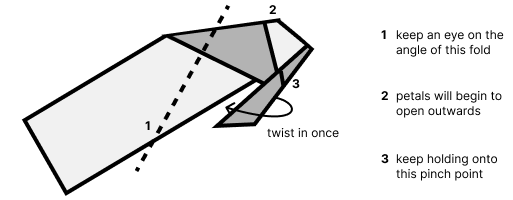
5. Remember we’re folding away from us for the remaining steps. Pinch the darker grey area (the area we just folded) and fold the top part of the paper away, roughly following the angle here. Pinch the top of the crease, but don’t crease the left edge of the fold. This will help keep the rose petals looking more curved at the edges.
6. Here’s where it begins to get tricky, but stay patient! And if you have a full roll of crepe paper you’ll have plenty of material to practice with so don’t be afraid to start over. After you make the fold in the last step, you’ll want to twist the ‘pistil’ part in towards you, while setting up for the next fold.
There’s two things happening here: first, you are making new ‘petals’ by folding the left side of the crepe paper, and secondly, you are ‘rolling’ the petals together by twisting the central ‘pistil’ in.
7. Keep repeating this pattern — folding the top edge down to create new petals, and twisting the pistil in to ‘roll’ those petals up. As you roll, try to think about the petals forming in an upwards-facing cone shape around the pistil — the pistil and the remaining crepe paper should be at more of a perpendicular angle than parallel.
8. When you have about ~2”in of crepe paper remaining, take the end and twist-tie it together with the center of the pistil that you’ve been holding onto (the part that’s in the very center of the rose you’ve been rolling). Secure this with floral tape and attach it to a floral wire — you’ve made your first crepe paper rose!